Project 52 - week 16: Try it in Black & White
For week 16 of Project 52, Try it in Black & White, I am in Spain!!! I found out last year about a dog photography workshop called 'Barkelona' to be held just outside of Barcelona and I am here. It is amazing - truly a pinch myself moment. I don't have the words to describe how beautiful it is and literally as I'm typing this the church bells in the village of Olivella which is just below our villa have started to ring. Today, it is my heaven. I am here with 14 other ladies from all over the world (America, England, Ireland and Australia) and the 3 instructors for the event: Kaylee Greer of Dog Breath Photography, (the color inspiration is for Kaylee and if this doesn't make sense, go to her page and read her bio), Charlotte of Charlotte Reeves Photography and Nicole of Nicole Begley Photography. A Barcelona based trainer Ingrid Ramon is staying here with us too AND she brought her dogs, Edna a rottie and Blat a yellow lab. (Blat means wheat in Spanish.) Ingrid has lined up all of the dogs that we'll be photographing over the next several days. It's going to be a jammed packed, exciting, memorable time!
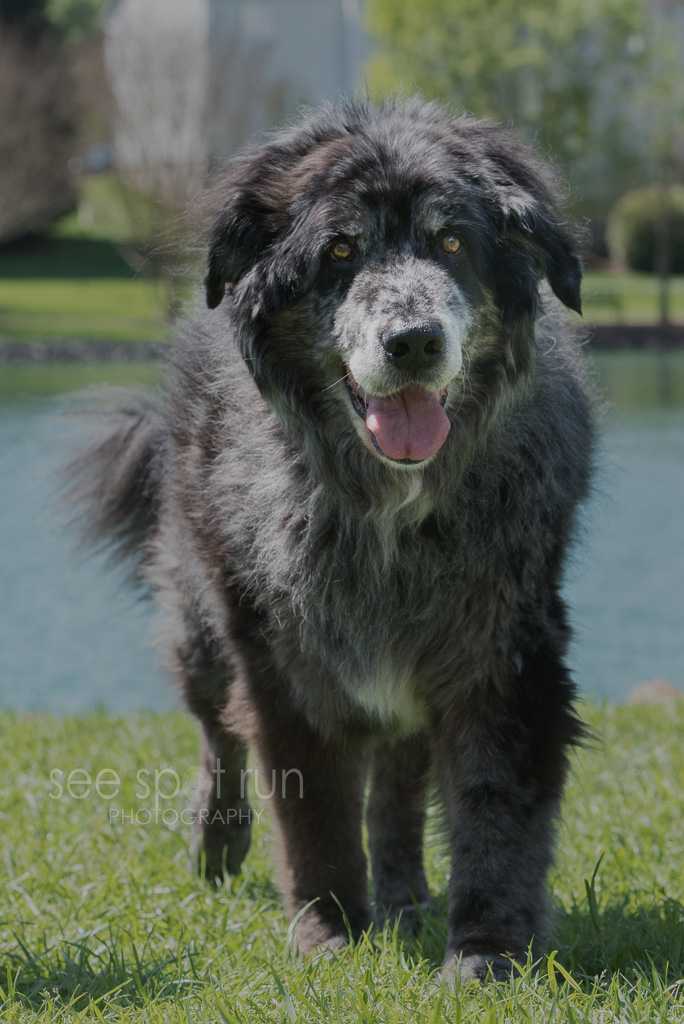
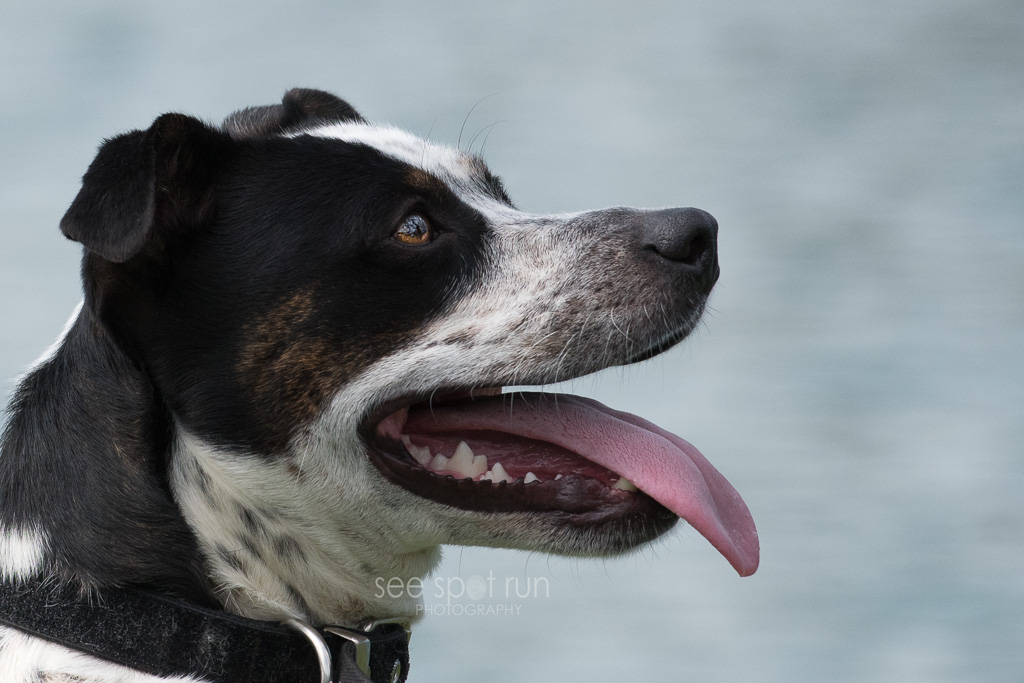
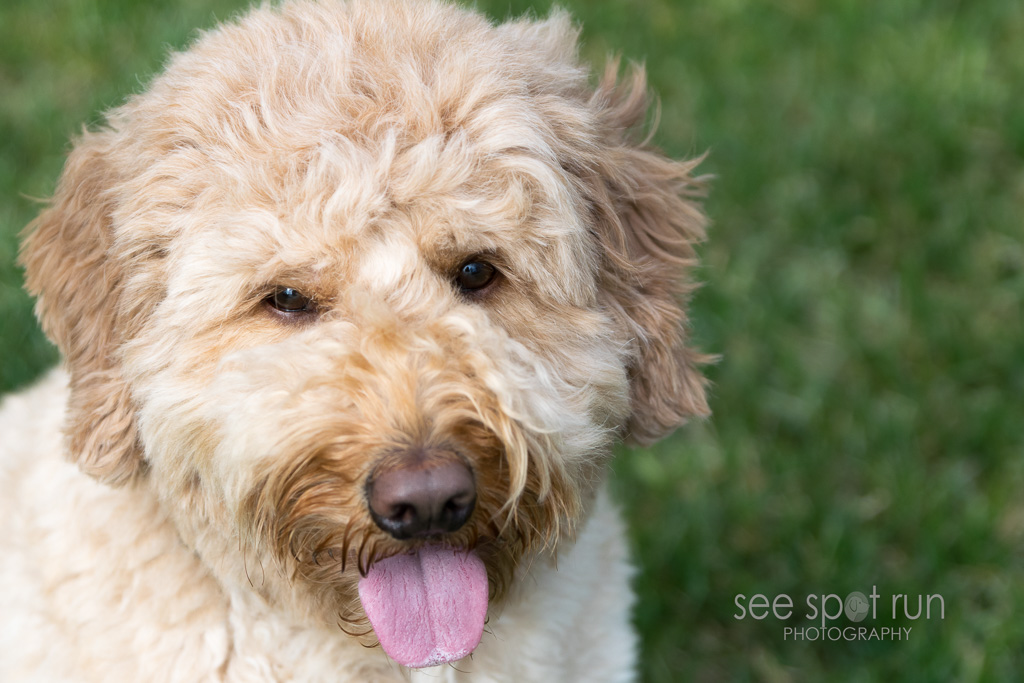
The village in Olivella is gorgeous. The stone work, the old buildings, the wildflowers and the surrounding hills are a perfect setting for photographing. We photographed 3 different sets of dogs last night. One of the dogs we photographed was a puppy named Luc. Since the theme for this week is try it in black & white, I thought Luc and his story would be appropriate for black & white photos.
Luc is a Galgo or Spanish Greyhound. I learned about these dogs and the breed's history during my stay in Spain. My heart broke when I learned more about these dogs' plight. For reasons I cannot understand, this breed originally brought to Spain by noblemen and held in high esteem, is now deemed worthless. They are used for hunting hare each season and then as part of the tradition, they are killed after the hunt. I couldn't bear to hear about their history and the torture they endure.
There are rescue groups across the world involved in improving the outlook for these dogs. We were fortunate and thrilled to meet Luc and his brother Ovi who were recently adopted. Yay for them!!


I didn't really get to know Luc but I believe this last photo probably sums him up. Just look at those bright eyes, nun ears and silly grin! Good for you Luc. Enjoy your life sweet pup!
Next up in the blog circle is Little White Dog Pet Photography - Sioux Falls, SD Be sure to click the link at the bottom of each post and you'll end up here when you are done.
PS If you'd like to see these two images in color, look at my blog post dated 4/21/16!
Project 52 - week 14 - Consider your Color Palette
This week's assignment, consider your color palette is one that I love because it is completely about developing your style as a photographer. This is something I think about but I haven't quite figured out how to capture what I would consider to be my color palette when I am shooting. When I look at other photographer's photos, I am drawn to images that are monochromatic. I like images that are calming and soothing but I struggle with creating those types of images depending upon where I am shooting and the subject. The first photo posted below nails this for me and I want to continue to strive to create images like this.
On Saturday 4/2, I attended an event called Paws in the Park in Pineville NC. It is a fundraiser to bring awareness to Black Dog Syndrome which is centered around black dogs being the last to get adopted from shelters and the first to be euthanized. There were tons of people and their dogs at the event. I had a booth, my camera and 3 friends to help. I took photos and I posted them on an online gallery for people to view and purchase if they were interested. If you'd like to look at the photos, here is a link to the gallery. I know I won't do this type of event many more times. It was a lot of work but at this point in time of my photography career, the experience for me was invaluable AND I had a blast!!
In thinking about the 'Consider your Color Palette' challenge for this week, it's easy for me to choose the photos because I was in the same location for 4 hours on Saturday snapping photos of dogs. The colors are similar although it is interesting to me because the weather changed so much during the day, the tone of the colors in the photos did too. Below are several that I took on Saturday.
What I can't figure out and I would love anyone's input on this, how do you create a style or a color palette in your gallery of photos when you are photographing different dogs in different locations when the colors aren't the same? I know a lot of the work can be done in post processing but how do you try and take photos that have the same color palette? That is another composition challenge I've yet to figure out but I'm having a lot of fun experimenting.


Click here to go to I Got the Shot Photography, Northeastern PA Pet Photographer's page and see her take on the Project 52 - week 14 - Consider your Color Palette challenge. Be sure to click the link at the end of each post and you'll end up right back here!
Project 52 - Week 13: Use Focus to Abstract
Our challenge this week is to 'use focus to abstract.' As a photographer and a new photographer at that, trying to use a 'lack of focus' to create an image seems foreign to me, uncomfortable even. I would imagine as I gain more experience I will become more comfortable with this idea but right now it isn't comfortable for me at all. I think this concept is particularly difficult when dealing with dogs or perhaps I am just not extremely creative (and that could be it too!) I can't wait to see what the others do with this assignment and perhaps I'll get some inspiration from them. Our instructions were to spend a day getting over our need for sharp focus. I can without a doubt say I've spent every moment behind the camera trying to capture sharp focus. TACK. SHARP. FOCUS.
We were instructed to create a body of art and post several images. Here is the reason why I'm not doing that: As a new photographer, I am trying to attract new customers. If a potential new client were to scroll through images on my blog and see a post of extremely blurry photos without reading the intention of the exercise, they would certainly get the wrong message. I'm afraid my attempts at using focus to abstract didn't result in images I loved. So, while I really appreciate the intention of this exercise and I love doing these each week, below is the one photo I'm posting.
I used curves in photoshop to draw your eye even more to my dog Willow's tongue. (Let me tell you, that was trial and error. I don't really get 'curves.') With curves I was able to blur the majority of her white fur so you loose the outline of the top of her head but her eyes and pink tongue are still distinguishable.
And yay to Willow for being my model this week. She is 10 years old, 11 in May and she has always been afraid of certain sounds. The sound of a train is her biggest fear which took us awhile to figure out when we adopted her 4 years ago. Over the past year, she has developed a dislike for the clicking sound my camera makes so she isn't my model very often. (Even with the beep turned off when the camera focuses, she still doesn't like the clicking of the shutter release.) Such a shame too because she has beautiful eyes.

I seriously can't wait to see what Northeast PA pet photographer, I Got The Shot Photography does with this assignment. Be sure to click the link to find out and then click the link at the bottom of each post to see what each photographer does!
Project 52 - week 12 - Deeper Focus
In week 12 of the Project 52 challenge, we are working on creating images with a deeper focus. In other words, we want all of the image to be sharp, not just the subject or part of the subject. The assignment said to adjust the aperture to f/10 which I did. I was trying to keep my ISO as low as possible so the photo wouldn't be so noisy (grainy) which meant that my shutter speed was pretty low. And what that means is if anything I'm trying to photograph moves, it won't be sharp. I should've adjusted to f/8. You see, I know this brown dog very well. This is my guy Moose and to get this photo, I had 2 photography assistants helping me. He's a great dog but not the easiest to photograph. His name is Moose and his name fits! He's a bit of a goofball - high energy and food motivated with a pretty strong prey drive. He will 'sit' on command but he's not so good at 'stay.' :(
Here is the (long) back story: Tuesday I'd posted on our facebook page that I was having a problem finding a location to use that had a pretty enough background to keep sharp. Many times I am in an area where I prefer to blur the background because it is cluttered but this week I'm supposed to keep the entire photo sharp. I had envisioned going to a Freedom Park which is really pretty (see below.) There I would have a really pleasing background. However my assistant(s) and I couldn't get our schedules coordinated to make that work.
In trying to come up with plan B, I thought about the blooming bushes in my own front yard. If I could get Moose in front of them, it'd make for a nice photo. So Wednesday morning, I had Moose outside when the neighborhood kids (who are my two best assistants) were waiting for their school bus and I asked them to help me. We had a window of about 15 minutes before the bus would come to try and get a photo that would work.
And this one does, sort of. All of Moose (and there is a lot of him at 90lbs) is in focus, albeit not as sharp as I would like but the bushes behind him aren't. If he wasn't sitting so close to the pink bushes, they'd be more in focus but this is where he finally sat down so I snapped away. Trying to move him forward and getting him to sit again would've been a challenge. With Moose, you take what you can get!

So, in this photo, Gracyn is standing with the leash camera right. Kelly is standing near me with treats in her hand. I'm about 20 yards away from Moose. Caption this photo: What does the look on Moose's face say?
He's a funny dog - he is either crashed on the couch or he is going ninety to nothing. My husband says he's a great dog 90% of the time and by that, I think he means when he is sleeping because the dog loves to sleep!
When he is outside and especially when there are treats around, he's pretty excited. That's why I should've known better than to try and take a photo with these settings. He wasn't very still and I'm disappointed that this image isn't tack sharp. Perhaps camera shake is at fault too. If there is another photo posted of Moose below with deeper focus, you will know I roped the girls into helping me Thursday morning before school too! They're such good sports.
I did get this photo of some Canadian geese earlier in the week. It's at f/8 and has the deeper focus the assignment required and below that are photos of Freedom Park from last fall. Next up in the blog circle is Pet Love Photography, serving Greater Cincinnati and the San Francisco Bay Area. Be sure to keep clicking the links at the bottom of each post to see each photographer's take on the Project 52 assignment - creating photos with a deeper focus.


Using a Slower Shutter Speed & Panning: Project 52 week 7 and 8
This week we combined the week 7 and week 8 challenges for Project 52: using a slow shutter speed and panning so I started with using a slower speed which I knew would be the easier of the two for me. Generally if you are trying to stop action in your image and you don't want your image to be blurry, you want your shutter speed to be at 1/250 or faster. Our instructions this week said to start with a shutter speed of 1/60. When using a slower shutter speed like 1/60, you are going to have some blur in your image. The trick was to create an image when this blur looks creative and not like a mistake. Well, my results are below and let me just state other than for the sake of this exercise, this isn't an image I would normally post online for everyone to see because its not very artsy looking. One of my biggest takeaways from this week's challenge was this information I got from the Photo Nuts & Shots ebook by photographer Neil Creek. In the book, he writes: "It may seem like your camera is capturing an instant in time, but in reality it’s capturing a duration of time equal to your shutter speed. This becomes critical to the image sharpness when there is movement during the exposure. This movement can be of the subject – referred to as ‘motion blur’, or of the camera itself – referred to as ‘camera shake’. One distinguishing feature of camera shake, when compared with motion blur, is that it affects the whole image. When a subject moves, only the moving parts appear blurred, but if the camera moves, the whole sensor moves relative to the subject."
I at least now understand the difference between motion blur and camera shake and I was able to accomplish motion blur in my image.
My models this week were Ollie (hound) and Sunny (retriever.) This shot was taken with a shutter speed of 1/30 (f/2.8 and ISO 100.) You can see that Ollie is sharper than Sunny. Sunny is moving faster than Ollie since he is scratching and he is also behind Ollie in the image which I believe would also impact why Ollie is sharper than Sunny.
The next part of the challenge was panning. Once you master using a slower shutter speed, the instructions said that panning would be easier. I need more work on using a slower shutter speed so my attempts at panning were laughable. Here is my takeaway from this part of the exercise: I should start with a subject that is moving predictably like cars or kids on bicycles. I might have a little more success. :)
Next up in the blog circle is Northeastern PA Pet Photographer, I Got The Shot Photography. Be sure to click the links at the bottom of each post. I am certain the others had better success with the challenge this week than I did!
Project 52 - week 5
If this is your first time to my blog, welcome! I have joined a facebook pet photography group that challenges its members to blog and post pictures about weekly topics. This is my first week participating although technically the group is in week 5. The group is called Project 52 and this week's challenge is "Optimize your RAW Exposures." At the end of this post is a link to the next photographer participating in the Project 52 challenge. Be sure to click the link and read their interpretation of this week's assignment. Since I probably have some new readers who don't know me here is a quick blurb about me. My name is Kim and I started a dog walking and pet sitting company in 2008. (My 7 year anniversary is April 4. It'll be 7 years!!!) I started the dog walking business because I have always loved dogs. The photography didn't come in until 6 years later. I have always enjoyed taking pictures but I never really thought about it much more than that, until 2014. In 2014, our black lab Buddy's health was failing. I knew I didn't want to make the mistake with him that I'd made with my two previous labs, Sloan and Sam. One of my biggest regrets is not having great (really GREAT) images of them. I have tons of pictures of them but none are very good. So, in August 2014 I bought a Nikon. Buddy died 5 weeks later but the images I took of him I will treasure forever. A year and a half later I really realize how much I didn't know at the time I was taking those photos of Buddy. Someone was looking out for me because a couple of them are actually okay. And that is how See Spot Run Photography was born.
So back to Project 52 - week 5. Here is this week's challenge from this newbie's* perspective and here are the instructions I was given: For this week, turn the "blinkies" on (Highlight Warnings or something similar in your camera menu). Since we're shooting in RAW, don't use the LCD to judge your exposure, because it's reading the camera's JPG. Use the histogram for taking your images and try to keep the exposure as far right as you can. You'll adjust the color and exposure in your post-processing.
Let me just say, that I am proud that I actually knew what this meant. (Now knowing what this meant and translating it to an image are two totally different things as I discovered and you will too if you keep reading!) Someone a long time ago must've told me about the blinkies and the histogram because I look at them a lot. Blinkies are on the LCD screen on the back of the camera and they flash when the whites in your image are too bright. The flashing is generally not a good thing - it means you need to make some adjustments on the camera to tone them down. (I am sure if I go back and read this down the road I will be completely embarrassed that this is my explanation for flashing highlights!) To keep the exposure as far to the right as possible, that means when I look at the histogram on the back of my camera, all of the mountains (data) should be on the right side.
Below is an example of what a histogram in Lightroom looks like. I couldn't figure out how to copy the histogram for one of my photos but this is basically what I was trying to achieve. I wanted to take a picture and I wanted the histogram data (mountains) to look similar to this one, with the data mainly on the right side. If you are looking at the histogram, the far left side is black and the far right is white so it goes from dark to light. Since the project 52 challenge was to have the data on the far right side, I knew I needed to find a lighter colored subject. This histogram could represent a photo of anything but there is definitely some lighter colored objects in the photo since that's where most of the data is.
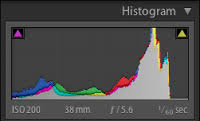
My goal was to have as many light colored objects in the image as possible to keep the data to the right. Blacks are on the far left side of the histogram so I didn't want anything black in the image. Task #1, I needed to find a dog to use as my subject.
I knew I was going to be walking Bailey today and Bailey is a precious, light tan colored, big-ole-fluff of a golden doodle. Unfortunately my walk with him was going to be around 1pm which is not ideal photo taking time but he is the only light colored dog I was seeing today. My 2nd problem was, I had no assistant to help me (which is frequently an issue I have.) Trying to take photos of dogs without someone to help is REALLY hard. (That's a topic for another discussion though.) After asking his family's permission to use him as my model and after our walk, we went to his backyard.
My initial thought was to have Bailey sit which he does really well if he knows he is going to get a treat. I thought I would position myself on the ground near him and shoot up at him with the sky in the background. It was pretty overcast (which was helpful since it was 1pm). I thought: light tan colored dog + overcast sky = most of the data pushed right. Right? Well, not exactly or at least not exactly when I took the photos. Bailey did great but he really didn't really understand why I so close to him on the ground. He kept wanting to stand up and when he stood up, he'd move around which is not an easy shot to try and take especially for me. (Why does my best assistant have to be 13 years old and in middle school at 1pm on a Monday?) Do I need to mention that at this point I am thinking to myself, " I hope the neighbors aren't watching!"
I moved on to Plan B even though I didn't really have a plan B. I did have an eye doctor appointment in about 30 minutes so I had about 15 more minutes to try and get a shot of him that met the Project 52 assignment. I can snap a lot of pictures in 15 minutes but getting a decent picture in that amount of time is hard and getting a decent image that meets the Project 52 challenge requirement might have proved to be impossible for me. But hey, that's why I'm doing this challenge, right? Chin up... I will strive to do better next week.
LESSONS LEARNED IN PROJECT 52 - WEEK 5: 1. Taking photos of dogs with long hair around their eyes is hard - I couldn't find them! 2. A black nose, black in the background and green grass will show up on the histogram on the far left and in the middle. Not the far right which was the assignment challenge. 3. By cropping a photo of Bailey, I was closer to fulfilling the assignment of creating a photo with most of the data on the right side of the histogram. (The 3rd photo.)
So, here is my effort for Project 52 - week 5.

If I crop this photo and get rid of most of the blacks and greens in the photo, then my histogram data is mainly on the right. :) Trust me on this... I cannot figure out how to copy the histogram here. I know it can be done but apparently not by me.

And lastly, *how long can I call myself a newbie? I am hoping for a very long time because I still have so much to learn.
If I haven't mentioned that I love doing this, I do! The feeling I get when I'm behind the lens photographing a dog is priceless and to discover that at this point in my life is well... life changing. Who knew!
Remember to check out the next photographer's take on this week's assignment and next up is Hoof N Paw Fine Art Photography. I'm excited to read everyone else's posts and see the cute pictures they post (remember this is a pet photography group!) Be sure to continue clicking the links at the bottom of each post. You'll end up right back here at See Spot Run Photography when you're finished.
PS I promise to try and make the next post shorter! Whew... congrats if you made it through this one.